Getting Started Guide With Docker
Abstract
This post aims to be an entry point to the docker landscape. It will show a basic docker concept and provide a simple example in order to better understand this technology. In this post we will talk about:
- the steps required to containerize an application
- the setup of the docker network
- the setup docker volume
The project’s purpose is to develop a simple nodejs dockerized application, which downloads all the audio files from a public youtube playlist. The application concerns the following steps and stakeholders:
- The user adds some video to a public playlist
- Once the user is inside his private network, he can trigger the node application
- The application downloads the tracks

Docker
Docker is based on three main concepts:
- build: encloses all actions required to create the docker image
- ship: the possibility to move the image to other systems
- run: the capability to execute the image in a container
Containers are completely isolated environments (they can have their own process, network interfaces, etc), except they all share the same kernel. There are several kinds of containers, however, docker utilizes the Linux container project (LXC).
In the following image, we compare Virtual Machine (VM) and Docker scaffolding.


The two approaches are deeply different.
VM is based on Hypervisor. This layer can create and manage all virtual machines running on the host machine. Docker runs single or multiple applications inside a container that share the same kernel of Host OS.
Docker approaches results in a much lighter way compared to VM for the following reasons:
- less resource consuming in terms of CPU and RAM
- less disk usage
- fast setting-up and boot
On the other hand, a main cons of the Docker approach is related to his base concept: “share the underlying kernel”. This means that docker is capable of running appliacation compliant with the Kernel Host only. Obviously a Linux machine cannot run directly a Windows container and vice-versa.
In a few words, we can summarize the Docker strengths as:
- containerize application (basically, you can containerize everything)
- run each service with its own dependencies in separate containers
- use a standard “toolchain” to build an image and run a container
- good for DevOps (there isn’t difference between the dev env, staging env, and production env)
Docker Sample Project
First thing first, we show the npm package required (package.json) and the code to set up the server (app.js). The section Constants defines the listening port and the host. The HOST is assigned to all IP addresses symbolic IP 0.0.0.0
The server exposes one endpoint only. The GET /download request delegates the download to a child process and implements some callback to handle:
- the std output of childProcess
- listen for errors
- the callback triggered once the process has finished
NB: The code represents an application example and more code improvements should be applied eg:
- add web GUI with some button to trigger the API
- better handling of res object (aka timeout)
- better handling of res.write with web socket
- protect access to API
- avoid invoking multiple time the endpoint until one instance of childProcess is running
- etc.
package.json
{
  "name": "yt-dowlonader",
  "version": "1.0.0",
  "description": "",
  "main": "app.js",
  "scripts": {
    "test": "echo \"Error: no test specified\" && exit 1"
  },
  "dependencies": {
    "cors": "^2.8.5",
    "express": "^4.17.1",
    "sanitize-filename": "^1.6.3",
    "ytdl-core": "^4.5.0",
    "ytpl": "^2.0.5"
  }
}
app.js
'use strict';

// Dev dependencies
const express = require('express');
var childProcess = require('child_process');
var fs = require('fs');
var path = require('path');

// Constants
const PORT = 8080;
const HOST = '0.0.0.0';

// App
const app = express();

app.get('/download', (req, res) => {

  // invoke the download procedure
  var process = childProcess.exec("node downloader.js");

  process.stdout.on('data', function (data) {
    console.log('stdout: ' + data.toString());
    res.write(data.toString());
  });

  // listen for errors as they may prevent the exit event from firing
  process.on('error', function (err) {
    console.log("err ", err)
  });

  // execute the callback once the process has finished running
  process.on('exit', function (code) {
    console.log("code ", code)
    res.status(200).end()
  });

});

app.listen(PORT, HOST);
console.log(`Running on http://${HOST}:${PORT}`);
The procedure that queries and downloads the playlist is contained in the downloader.js.
The downloader uses the following node packages:
- ytpl: is useful to retrieve all video links from playlist-id.
Link to Github - ytdl-core: is a node wrapper to download a video from youtube from its URL. This module allows to apply some filter eg: format: ‘mp4’ andfilter: ‘audioonly’Link to Github
- sanitize-filename: Sanitize a string to be safe for use as a filename by removing directory paths and invalid characters.
Link to Github
NB: for simplicity, we haven’t handled the pagination hence ytpl can return the first 100 links only.
The code below retrieves the first 100 links and store them in the data structure called playlist.items.
For each item, in playlist.items, the URL is evaluated and subsequently, the audio is downloaded in a folder called down (in the root of the project).
downloader.js
var ytpl = require('ytpl');
const ytdl = require('ytdl-core');
const fs = require('fs');
var sanitize = require("sanitize-filename");

async function download() {
  const playlist = await ytpl('[playlist-ID]');

  playlist.items.forEach(element => {
    try {

      if (!ytdl.validateURL(element.url)) {
        console.log("invalid url")
        throw InvalidUrlException;
      }

      ytdl(element.url, { format: 'mp4', filter: 'audioonly', })
        .on('finish', function () {
          console.log('Download finished... ' + sanitize(element.title));
        })
        .pipe(
          fs.createWriteStream("down/" + sanitize(element.title) + ".mp4")
        );
    } catch (error) {
      console.log(error)
    }
  });
}

download();
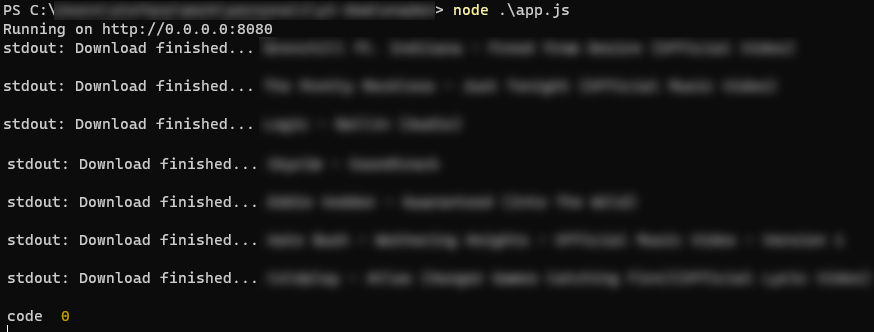
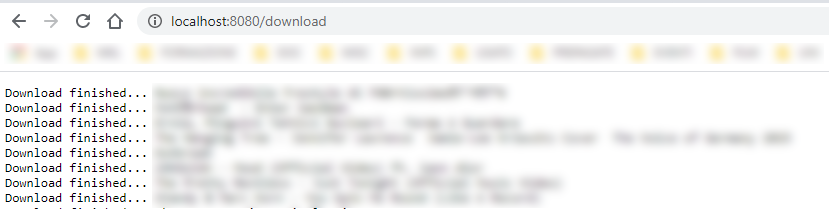
To test the application we try to run it manually.
- run server by CLI command node app.js
- the server prints the message Running on http://0.0.0.0:8080
- on a browser URL, we invoke the API on the same pc where we are running the server (right above image)
After this test, we proceeded to deploy all source code through a versioning system to our raspberry.
Dokerize the application
To instruct docker how to set up the image, it is required to define a dockerfile.
The dockerfile is a text file written in a specific format instruction followed by an argument.
Each line of instruction creates a new layer in the docker image, so for example if we consider the following dockerfile:
FROM ubuntu
RUN apt-get update
RUN apt-get install python
RUN pip install flask
RUN pip install flask-mysql
COPY . /opt/source-code
ENTRYPOINT FLASK_APP=/opt/source-code/app.py flask run
Layer 1. Base Ubuntu Layer
Layer 2. Changes in apt package
etc…
Dockerfile can contain several types of directive and is strongly suggested to read the Best practices.
In our case, the pipeline to automize is straightforward, hence we can follow a standard approach.
It can be summarized with the following steps:
- Set up the base image: the FORM directive is the first instruction to use because it affects the subsequent instructions available in the image.
In our case, the application is node/npm based, and by providing parameter node:14 we have already a working node environment. - The WORKDIR directive is used to set the working directory for any RUN, CMD, ENTRYPOINT, COPY and ADD commands during the build
- The COPY directive is used for copying files and directories from the host system to the image during the build
- Use RUN directive to run any command to image during build time. In our case, we must install dev dependencies
- COPY all file in docker env
- The EXPOSE directive indicates the ports on which a container will listen for the connections.
- With the last directive, docker starts our server
dockerefile
FROM node:14
# Create app directory
WORKDIR /usr/src/app
# Install app dependencies
# A wildcard is used to ensure both package.json AND package-lock.json are copied
# where available (npm@5+)
COPY package*.json ./
RUN npm install
# Bundle app source
COPY . .
EXPOSE 8080
CMD [ "node", "app.js" ]
Finally, we have completed all setup steps, therefore we can proceed to build the image and run the container.
To build an image, we only need to run the following command:
docker build -t yt-dowloander .
the option -t or -tag isn’t required but is recommended to provide a meaningful name or tag on your image. If the -t is missing docker provides a random name for you.
Before running the container we must explain a very relevant detail: “containers are meant to run a specific task or process, once the task is complete the container exits”.
A container lives as long the process inside it is alive. If the application is stopped or crashed, the container exits, yet in our case, we want to keep our server running as long as possible.
To overcome this issue we must run the container in detached mode:
docker run -d yt-dowloander
Option -d will run the docker container in the background mode hence the server can work as expected, until we decide to stop it.
Networking and data persistant
As a final remark, we want to talk about other two aspects:
- the networking
- the data persistence
By default docker supports three types of network configuration: bridge, none, host.
If we decide to use the bridge default network settings the container is running
in a private internal network created by docker on the host.
Each container has an internal IP usually in the range of 170.2.17.*
With this choice, we cannot trigger our API
unless we have access to the raspberry.
To overcome this problem we can map the port inside the docker container to a free port on the docker host.
docker run -p 80:8080 -d ty-downloader
With the above command, we redirect all traffic from port 80 (of raspberry) to port 8080 (of docker container).
As described above a docker container is an isolated system with its own filesystem hence any changes to any file remain inside the container (if the container is stopped we cannot directly access the data).
If you want to keep the data persistence outside the container you should map a directory called volume between the docker container and host machine.
Docker application examples
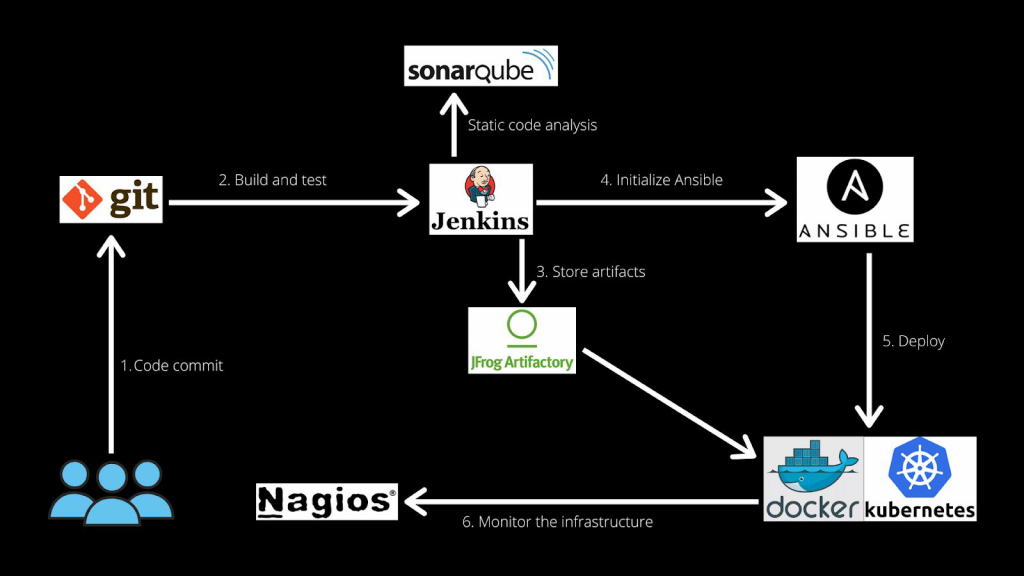
As described before docker fits perfectly well in the DevOps ecosystem. The image on the right cc. to “Docker guide FOR EVERYONE” By Pavan Belagatti shows a standard role of the docker container managed by Kubernetes to handle the final step of deploying.
On the other hand, there are further examples of usage which concern a development aspect and not a final deployment only.
As described in the PYNQ change log, docker is ready to run on any PYNQ enabled board (Zynq-7000, ZU+, and RFSoC).
This Xilinx article describes how vitis-ai includes all the tools necessary for training ML models on Xilinx’s DPU.
In the context of Xilinx Platforms (PYNQ based), it means that users can explore delivering and sharing FPGA applications through Docker Hub or within container-based orchestration frameworks.

[…] TIP: You can use a Docker container as an Ansible host. Check out our Getting Started Guide with Docker article to know how to install […]