
Shared Memory in a NodeJS application
Introduction
In this article about shared memory, we are going to show in broad terms how two different programming languages, such as JavaScript and C++, can interact with each other. Specifically, we are going to introduce the concept of shared memory and illustrate an example in which two processes interact through this data exchange system.
In the first part we will give some useful definitions to better understand what we are going to explain later in the second part, in which we present some examples of commented code.
the Shared memory
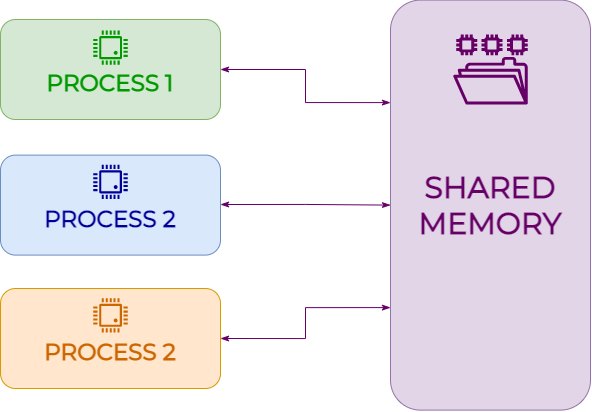
The concept of shared memory has an important meaning inside processes that share information among each other. Indeed, we can define shared memory as a memory segment that is simultaneously accessible by several processes providing a means of communication and/or avoiding repetitions of data. It is a good means to pass a huge amount of data among processes and it is also faster than the model based on messages. The main difference compared to the last mentioned model is that shared memory does not assume system calls, which require kernel intervention (therefore the two processes take longer to exchange data). In the shared memory model, system calls are necessary only to establish memory regions in order to treat all the accesses as routine accesses to memory.
Below we illustrate an example of how shared memory works in communication among processes.3CmxGraphModel%3E%3Croot%3E%3CmxCell%20id%3D%220%22%2F%3E%3CmxCell%20id%3D%221%22%20parent%3D%220%22%2F%3E%3CmxCell%20id%3D%222%22%20value%3D%22%26lt%3Bbr%20style%3D%26quot%3Bfont-size%3A%2023px%3B%26quot%3B%26gt%3BPROCESS%201%22%20style%3D%22rounded%3D1%3BwhiteSpace%3Dwrap%3Bhtml%3D1%3BfontFamily%3DMontserrat%3BfillColor%3D%23d5e8d4%3BstrokeColor%3D%2382b366%3BfontStyle%3D1%3BfontColor%3D%23009900%3BfontSize%3D23%3B%22%20vertex%3D%221%22%20parent%3D%221%22%3E%3CmxGeometry%20x%3D%22140%22%20y%3D%22240%22%20width%3D%22220%22%20height%3D%22100%22%20as%3D%22geometry%22%2F%3E%3C%2FmxCell%3E%3CmxCell%20id%3D%223%22%20value%3D%22%22%20style%3D%22pointerEvents%3D1%3Bshadow%3D0%3Bdashed%3D0%3Bhtml%3D1%3BstrokeColor%3Dnone%3BlabelPosition%3Dcenter%3BverticalLabelPosition%3Dbottom%3BverticalAlign%3Dtop%3Balign%3Dcenter%3BoutlineConnect%3D0%3Bshape%3Dmxgraph.veeam.cpu%3BfontFamily%3DMontserrat%3BfontColor%3D%23660066%3BfillColor%3D%23009900%3B%22%20vertex%3D%221%22%20parent%3D%221%22%3E%3CmxGeometry%20x%3D%22232.82%22%20y%3D%22249.65%22%20width%3D%2234.35%22%20height%3D%2234.35%22%20as%3D%22geometry%22%2F%3E%3C%2FmxCell%3E%3C%2Froot%3E%3C%2FmxGraphModel%3
Writing to shared memory in NodeJS
We test the code provided in this section using an operating system of Linux, specifically Ubuntu 20.04 LTS.
However, before starting the tutorial about how to write on shared memory, we should see the prerequisites needed. First of all, we have to install NodeJS on our device and then, after watching this tutorial, we will be able to create a real web server that displays two simple APIs to write on and read from shared memory.
The first step is to download the public repository on GitHub, which could be done by using the button below.
Step 1 - NodeJS code analysis
Once we unpack the archive, we find a directory that includes all the files used to make the server work. We begin by analyzing in detail the file package.json, which contains the dependencies to install.
{
  ...
  "dependencies": {
    "express": "^4.17.1"
  },
  ...
}
We can see that it requires the installation of the express module only. The directory shmnode contains the package that handles the interaction with shared memory. We have to compile this package separately through special commands, that we are going to illustrate later.
Talking about the code related to the server construction, its default port is 8080 but we can set it as we prefer modifying the related value in the code.
http.listen(8080, function () {
    console.log('listening on *:8080');
});
Then, we set up two routes:
- GET /read: with this route we are able to read from the shared memory;
app.get('/read', (req, res) => {
    var dataFromShm = shm.read();
    res.send(dataFromShm);
});
The API returns what shared memory reads, using the command shm.read().
- POST /write: with this route we are able to write on the shared memory;
app.post('/write', (req, res) => {
    var buffer = Buffer.from(JSON.stringify(req.body));
    shm.write(buffer);
    var dataFromShm = shm.read();
    res.send(dataFromShm);
});
The API converts the body in a buffer and, then, it passes it into a function that we can use to write on the shared memory through the command shm.write(buffer). Reading from the shared memory through the command shm.read(), it provides as output what we just passed as body to the API.
Step 2 - C++ code analysis
To create the custom NodeJS module, we rely on the so-called addons. These allow us to write C++ code obtaining a ready-made module that we can use in NodeJS through the functions defined during the creation of the addon.
What are these addons?
Referring to the official documentation, addons are dynamically-linked shared objects written in C++.
There are three different ways to write them, using:
- Node-API;
- Native Abstraction for Node.js (nan);
- Internal libraries V8, libuv and Node.js;
The advice that the official documentation provides us is to use Node-API as long as it does not require any direct functionality. Therefore, now we are going to see how to create our addon using the internal libraries.
How to use internal libraries
Creating an addon using internal libraries is not easy to understand but this means we are totally free to use whatever we want, such as elements that Node-API does not expose.
We are going to use the following components:
- V8: it is the Node.js library used to implement JavaScript. V8 provides mechanisms to create objects, function calls etc. The file v8.h defines V8 APIs, which is in the header file deps/v8/include/v8.h inside the Node.js root directory (also available online);
- libuv: it is a C library used to implement Node.js events, worker threads and all asynchronous behaviours of the platform;
- Internal libraries: Node.js shows itself some API that the addon can use.;
First configuration of the addon
To launch the module through calls in NodeJS, we have to train our addon. Therefore, we are going to write these lines:
void init(Handle<Object> exports){
    NODE_SET_METHOD(exports, "read", ReadSHM);
    NODE_SET_METHOD(exports, "write", WriteSHM);
}
NODE_MODULE(shmnode, init);
Thanks to that, we are able to show the two methods that allow us to read from and write on the shared memory. So, on NodeJS we name read() the function used to read, while we name write(buffer) the function used to write the buffer in the common memory space.
Configuration parameters of the shared memory
Now it is time to see some pieces of code that are going to create our addon. First, we refer to a file that we can use in the interaction with the shared memory, that is shm.cpp.
After importing all dependency files, we define which constants are going to be the ones inside our segment of shared memory. In the piece of code below we define the key and the dimension of our shared memory.
const int SHM_KEY = 32140895;
const int SHM_SIZE = 2048;
There are three ways to determine the key:
- Specifying an integer value;
- Generating it through the function ftok();
- Through the directive IPC_PRIVATE;
For the sake of simplicity, we chose to assign an integer value to the key of the shared memory. Then, we specified the memory dimension in byte, specifically 2048 byte.
Writing on the shared memory
Now we are going to analyze the piece of code that we use to write on the shared memory.
The function, we referred to, is WriteSHM.
Local<Object> bufferObj = args[0].As<Object>();
uint8_t* dataBuffer = (uint8_t*) node::Buffer::Data(bufferObj);
size_t bufferLength = node::Buffer::Length(bufferObj);Here, we have the piece of code used to create or to recover the shared memory segment, which we have to write on. The function shmget(SHM_KEY, SHM_SIZE, 0644 | IPC_CREAT) creates the memory segment with a SHM_SIZE dimension (if it does not exist) or it recovers the memory segment based on the past key (SHM_KEY).
Furthermore, it gives as output the ID of the memory portion (SHM_ID). In the next line, instead, it is where we get attached to the shared memory. In this way, if we write in the variable char* shm, we will write in the shared memory space. At the beginning, we have a semaphore, which is locked, in order to avoid possible writing collisions.
semdes = sem_open(sem_fn, O_CREAT, 0644, 0);
if ( (SHM_ID = shmget(SHM_KEY, SHM_SIZE, 0644 | IPC_CREAT)) == -1) {
    perror("shmget");
    exit(1);
}
char* shm = (char*) shmat(SHM_ID,(void*)0,0);This last phase concerns writing bytes in the above-mentioned memory space. Each element of dataBuffer is written in the related cell of the variable shm. As the last element, the string terminator ‘\0’ is included. Finally, the detach from the shared memory is made and the semaphore is released.
for(int i = 0; i < (int)bufferLength; i++)
    shm[i] = dataBuffer[i];
for(int i = (int)bufferLength; i < SHM_SIZE; i++)
    shm[i] = 'for(int i = 0; i < (int)bufferLength; i++)
shm[i] = dataBuffer[i];
for(int i = (int)bufferLength; i < SHM_SIZE; i++)
shm[i] = '\0';
shmdt(shm);
sem_post(semdes);
';
shmdt(shm);
sem_post(semdes);
We provide the whole function below.
void WriteSHM(const FunctionCallbackInfo<Value> &args){
Local<Object> bufferObj = args[0].As<Object>();
uint8_t* dataBuffer = (uint8_t*) node::Buffer::Data(bufferObj);
size_t bufferLength = node::Buffer::Length(bufferObj);
semdes = sem_open(sem_fn, O_CREAT, 0644, 0);
if ( (SHM_ID = shmget(SHM_KEY, SHM_SIZE, 0644 | IPC_CREAT)) == -1) {
perror("shmget");
exit(1);
}
char* shm = (char*) shmat(SHM_ID,(void*)0,0);
for(int i = 0; i < (int)bufferLength; i++)
shm[i] = dataBuffer[i];
for(int i = (int)bufferLength; i < SHM_SIZE; i++)
shm[i] = 'void WriteSHM(const FunctionCallbackInfo<Value> &args){
Local<Object> bufferObj = args[0].As<Object>();
uint8_t* dataBuffer = (uint8_t*) node::Buffer::Data(bufferObj);
size_t bufferLength = node::Buffer::Length(bufferObj);
semdes = sem_open(sem_fn, O_CREAT, 0644, 0);
if ( (SHM_ID = shmget(SHM_KEY, SHM_SIZE, 0644 | IPC_CREAT)) == -1) {
perror("shmget");
exit(1);
}
char* shm = (char*) shmat(SHM_ID,(void*)0,0);
for(int i = 0; i < (int)bufferLength; i++)
shm[i] = dataBuffer[i];
for(int i = (int)bufferLength; i < SHM_SIZE; i++)
shm[i] = '\0';
shmdt(shm);
sem_post(semdes);
}
';
shmdt(shm);
sem_post(semdes);
}Reading from the shared memory
The second piece of code that we analyze concerns reading from the shared memory. In particular, the function is similar to the one that we have seen before in the writing section. The only difference is that no input has been parsed here. The memory segment recovery and the attach are done in the same way as before, while the return of the reading value comes from the function GetReturnValue(), to which we pass the string (shm) read from the shared memory portion.
args.GetReturnValue().Set(String::NewFromUtf8(isolate, shm));Below we provide the whole reading function.
void ReadSHM(const FunctionCallbackInfo<Value> &args){
    Isolate *isolate = Isolate::GetCurrent();
    HandleScope scope(isolate);

    semdes = sem_open(sem_fn, O_CREAT, 0644, 0);

    if ( (SHM_ID = shmget(SHM_KEY, SHM_SIZE, 0644 | IPC_CREAT)) == -1) {
        perror("shmget");
        exit(1);
    }

    char* shm = (char*) shmat(SHM_ID,(void*)0,0);

    args.GetReturnValue().Set(String::NewFromUtf8(isolate, shm));

    sem_post(semdes);
}
Step 3 - Module building
We finally reach the point in which our NodeJS module can be created! To do that, starting from the directory in which there is the file shm.cpp, we launch the next two commands of node-gyp. These are necessary to realize the final configuration and to build the addon. To install the node-gyp, we refer to the official documentation of npm available here.
node-gyp configure --debug
node-gyp build --debug
In this way, we obtain our module that is now ready to be used in NodeJS! To call it back, it is only necessary to define it into NodeJS code in this way:
const shm = require('./shmnode/build/Debug/shmnode.node')Doing this, we can call the reading function through the command shm.read() and the writing function through the command shm.write(buffer).
To see the full code of this project, we can always refer to our public repository on GitHub.
