
KR260 and Sony Camera: an accelerated tutorial
Introduction
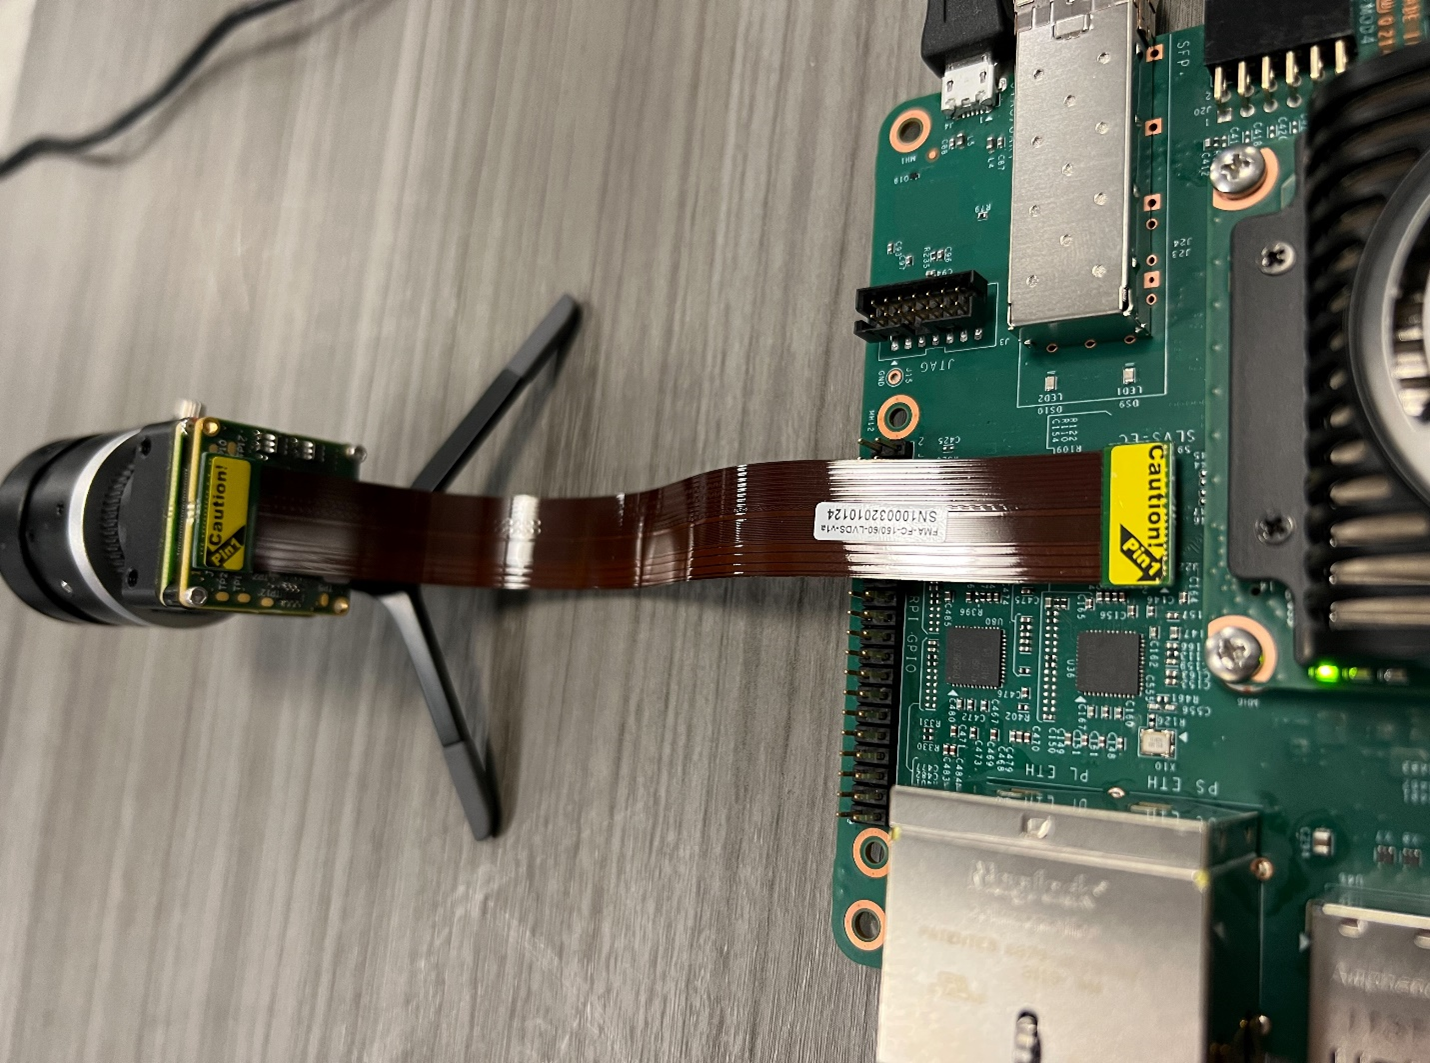
The integration of machine vision capabilities with the KR260 board and the Sony IMX547 Camera presents a powerful solution for image processing applications. This tutorial revisits the deployment process outlined in the official documentation here, providing step-by-step instructions to accelerate your setup.
Installation of Ubuntu on KR260
Begin by installing the official Ubuntu image for KR260 on a new SD card. You will find the image here.
Download the Balena Etcher (recommended; available for Windows, Linux, and macOS). Follow the instructions in the tool and select the downloaded image to flash onto your microSD card.

Once your microSD card is flashed with the image, proceed to the next step.
Setting Up the Environment on KR260
Once the board is booted, you need to connect to your KR260. You can use the USB cable or via SSH (but you need to know what is the board IP on your network).
Then, execute the following commands to configure the environment:
# install the basic configuration for KRIA App store
sudo snap install xlnx-config --classic --channel=2.x
sudo xlnx-config.sysinit
sudo add-apt-repository ppa:xilinx-apps
sudo add-apt-repository ppa:ubuntu-xilinx/sdk
sudo apt update
sudo apt upgrade

# install docker
sudo groupadd docker
sudo usermod -a -G docker $USER
sudo apt install docker

# install the docker app image
sudo apt install xrt-dkms
sudo xmutil getpkgs
sudo apt install xlnx-firmware-kr260-mv-camera
sudo docker pull xilinx/mv-defect-detect:2022.1
Install additional packages
In order to use GStreamer completely, we need some additional packages. So, run those commands:
# install Gstreamer packages
sudo apt-get install gstreamer1.0*
sudo apt install ubuntu-restricted-extras
sudo apt install libgstreamer1.0-dev libgstreamer-plugins-base1.0-dev

# if you want to just download the compiled files of OpenCV for Python
mkdir -p opencv/opencv-python-master
cd opencv/opencv-python-master
wget https://s3.eu-west-1.wasabisys.com/xilinx/kr260/numpy-1.26.2-cp310-cp310-manylinux_2_17_aarch64.manylinux2014_aarch64.whl
wget https://s3.eu-west-1.wasabisys.com/xilinx/kr260/opencv_python_headless-4.6.0%2B4638ce5-cp310-cp310-linux_aarch64.whl

# If you want to compile OpenCV on the KR260
OPENCV_VER="master"
TMPDIR=opencv
mkdir $TMPDIR
# Build and install OpenCV from source.
cd "${TMPDIR}"
git clone --branch ${OPENCV_VER} --depth 1 --recurse-submodules --shallow-submodules https://github.com/opencv/opencv-python.git opencv-python-${OPENCV_VER}
cd opencv-python-${OPENCV_VER}
export ENABLE_CONTRIB=0
export ENABLE_HEADLESS=1
# we want GStreamer support enabled.
export CMAKE_ARGS="-DWITH_GSTREAMER=ON"
# generate the wheel package
python3 -m pip wheel . --verbose
Create the setup docker file
In order to avoid, after every "docker run" command, a list of annoying commands, let's create a setup docker file, called "setup_docker.sh" in the /home/ubuntu directory:
configure
media-ctl -d /dev/media0 -V "\"imx547 7-001a\":0 [fmt:SRGGB10_1X10/1920x1080 field:none @1/60]"
modetest -D fd4a0000.display -s 43@41:1920x1080-60@BG24 -w 40:"alpha":0
modetest -D fd4a0000.display -s 43@41:1920x1080-60@BG24 -w 40:"g_alpha_en":0
cd opencv/opencv-python-master
python3 -m pip install opencv_python*.whl
Now, power off your KR260, connect the camera and we are ready to start!
Launching the Docker Container on KR260
Setup the Xilinx application:
sudo xmutil desktop_disable
sudo xmutil unloadapp
sudo xmutil loadapp kr260-mv-camera
Launch the Docker container with the following commands:
sudo docker run \
--env="DISPLAY" \
--env="XDG_SESSION_TYPE" \
--net=host \
--privileged \
--volume /tmp:/tmp \
--volume="$HOME/.Xauthority:/root/.Xauthority:rw" \
-v /dev:/dev \
-v /sys:/sys \
-v /etc/vart.conf:/etc/vart.conf \
-v /lib/firmware/xilinx:/lib/firmware/xilinx \
-v /run:/run \
-v /home/ubuntu:/home \
-h "xlnx-docker" \
-it xilinx/mv-defect-detect:2022.1 \
bash -c "cd /home; chmod 777 ./setup_docker.sh; ./setup_docker.sh; bash"
If the terminal "hangs" on this warning:
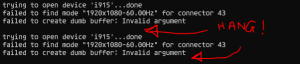
just press "Enter" and the terminal will continue.
Verifying Camera Functionality
We can test the output of the camera directly using the Display Port of the KR260:
gst-launch-1.0 v4l2src device=/dev/video0 io-mode=5 ! video/x-raw, width=1920, height=1080, format=GRAY8, framerate=60/1 ! perf ! kmssink bus-id=fd4a0000.display -v
Or, to verify that the camera is working, use the following command to capture an image:
gst-launch-1.0 v4l2src device=/dev/video0 ! video/x-raw, width=1920, height=1080, format=GRAY8, framerate=60/1 ! queue ! videoconvert ! jpegenc ! filesink location=output.jpeg
This GStreamer pipeline captures video from a V4L2 (Video for Linux 2) device at `/dev/video0` and processes it with the following steps:
- v4l2src: Captures video frames from the specified V4L2 device (`/dev/video0`).
- video/x-raw: Specifies the raw video format without any compression or modification.
- width=1920, height=1080, format=GRAY8, framerate=60/1: Sets the width, height, format (GRAY8 for grayscale), and framerate of the video.
- queue: Buffers the frames in a queue to ensure smooth processing.
- videoconvert: Converts the video format if needed for downstream elements.
- jpegenc: Encodes the video frames into JPEG format.
- filesink location=output.jpeg: Writes the resulting JPEG frames to a file named "output.jpeg."
Development with KR260 and Machine Video Camera
Using GStreamer Pipeline with VART
Developing with this configuration allows for flexibility with both GStreamer and OpenCV. To use GStreamer, leverage the VART library.
Using OpenCV with GStreamer as Server
In order to simplify the tests, we can use OpenCV as a "frontend" and GStreamer as a "backend". In this way, we can simplify the control flow in an explicit way.
Using C++, we have:
cv::VideoCapture videoReceiver("v4l2src device=/dev/video0 ! video/x-raw, width=1920, height=1080, format=GRAY8, framerate=60/1 ! appsink", cv::CAP_GSTREAMER);
This line of code initializes a `cv::VideoCapture` object in C++ using the OpenCV library, specifically for GStreamer-based video capture. Let's break down the parameters:
- "v4l2src device=/dev/video0 ! video/x-raw, width=1920, height=1080, format=GRAY8, framerate=60/1 ! appsink": This is a GStreamer pipeline specified as a string. It describes the series of actions to capture video from a V4L2 device (`/dev/video0`), set its properties (width, height, format, and framerate), process it through various GStreamer elements (queue, videoconvert), and finally, output it through an appsink.
- cv::CAP_GSTREAMER: Specifies the backend to be used for capturing video, in this case, GStreamer.
Using Python, we have:
pipeline = "v4l2src device=/dev/video0 ! video/x-raw, width=1920, height=1080, format=GRAY8, framerate=60/1 ! appsink" cap = cv2.VideoCapture(pipeline, cv2.CAP_GSTREAMER)
That has the same result as the C++ code, but much easier.
So, let's try to implement in Python a simple frame-grabber software:
import cv2

input_pipeline = "v4l2src device=/dev/video0 ! video/x-raw, width=1920, height=1080, format=GRAY8, framerate=60/1 ! appsink"
cap = cv2.VideoCapture(input_pipeline, cv2.CAP_GSTREAMER)

output_pipeline = "appsrc ! kmssink bus-id=fd4a0000.display"
out = cv2.VideoWriter(output_pipeline, 0, 60, (1920, 1080), isColor=False)

i = 1000
while i > 0:
    ret, frame = cap.read()
    out.write(frame)
    i -= 1

cap.release()
out.release()
You will see, on your monitor connected to the KR260, the frames! But it seems "slow". This is because unfortunately, the data transfer between the PL and the PS is quite heavy.
So, we can modify the code in this way, in order to see a "smooth" video:
import cv2
import time

input_pipeline = "v4l2src device=/dev/video0 ! video/x-raw, width=1920, height=1080, format=GRAY8, framerate=60/1 ! queue ! appsink"
cap = cv2.VideoCapture(input_pipeline, cv2.CAP_GSTREAMER)

output_pipeline = "appsrc ! queue ! kmssink bus-id=fd4a0000.display"
out = cv2.VideoWriter(output_pipeline, 0, 60, (1920, 1080), isColor=False)

i = 1000
frame_in = []
while i > 0:
    ret, frame = cap.read()
    frame_in.append(frame)
    i -= 1

i = 1000
while i > 0:
    out.write(frame_in.pop())
    i -= 1

cap.release()
out.release()
In this way, first, we grab every frame, and then we forward all the frames to the Display Port.
Conclusion
This tutorial provides a comprehensive guide to setting up the KR260 board with a Machine Video Camera using Docker containers and GStreamer. It offers a foundation for further development, whether using GStreamer pipelines or OpenCV flows. Experiment and integrate this powerful combination into your machine vision projects for enhanced image processing capabilities.
Do you need additional tutorials? Find them out here!
