
MuseBox: How to create your AI pipeline in FPGA
Introduction
Artificial intelligence (AI) applications often require high-performance computing resources and specialized hardware platforms. Field-programmable gate arrays (FPGAs) are one of the promising options for accelerating AI applications. However, they can be challenging and time-consuming to program. In this article, we present a novel approach for creating AI pipelines in FPGA using MuseBox and PYNQ.
MuseBox is a real-time machine learning system that uses different AI tasks to process audio and video sources. Meanwhile, PYNQ is an open-source project that makes it easy to program on embedded systems using Python. So, by combining these two technologies, we can create powerful and flexible AI solutions.
The main goal of this article is to show how to use MuseBox and PYNQ to create an AI pipeline. We will describe the hardware and software setup, the main steps of the AI pipeline, and the results of our approach. Also, we hope that this article will inspire and help other developers who are interested in creating AI pipelines in FPGA using MuseBox and PYNQ.
What is new?
![]()
We are thrilled to announce that we have developed the Python bindings for our MuseBox AI product. Why is this beneficial? We can explore FPGA programming, machine learning, and multimedia processing in a simple and convenient way. And, we can build and customize our own AI pipeline and project using MuseBox in a much easier way.
Setup
Firstly, for the setup, we are using a KV260 board from AMD, which is a vision-ready development platform for Kria K26 SOMs. On top of it is running Ubuntu 22.04 LTS, PYNQ, PYNQ-DPU, and MuseBox.
Therefore, the first step to do is to install Ubuntu 22.04. We are using the latest version from Install Ubuntu on Xilinx | Ubuntu.
Secondly, we should install Kria-PYNQ and PYNQ-DPU. It may take some time.
Finally, once we finish installing everything we mentioned, we can now use MuseBox to create our own AI pipeline. For this article, we will use Jupyter Notebooks to show the whole AI pipeline on the board.
Creating an AI Pipeline
As we mentioned before, for this article, we are using the MuseBox Python bindings. After installing Kria-Pynq and PYNQ-DPU, we should be able to open the Jupyter Notebooks on <board_ip>:9090.
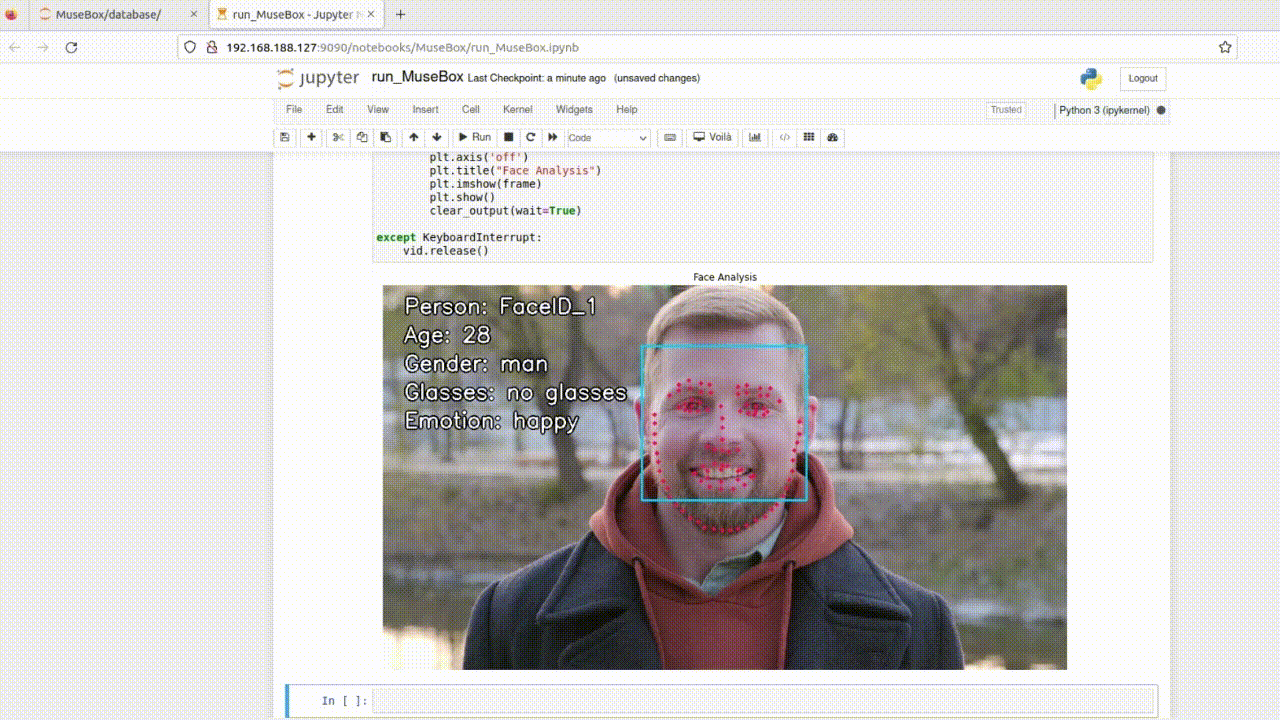
Face Analysis
MuseBox offers many AI tasks, for this article we will create a Face Analysis AI pipeline.
We start by importing the libraries that we will need:
import cv2
import numpy as np
import matplotlib.pyplot as plt
from IPython.display import clear_output
%matplotlib inline
Then, we import and init the AI tasks that we want to run, as so:
from faceDetection import FaceDetection
from ageDetection import AgeDetection
from genderDetection import GenderDetection
from faceLandmark import FaceLandmark
from faceRecognition import FaceRecognition
from glassesDetection import GlassesDetection
from emotionDetection import EmotionDetection
# Init networks - Face Analysis
faceDetection = FaceDetection(0.75, 0.15)
ageDetection = AgeDetection()
genderDetection = GenderDetection()
glassesDetection = GlassesDetection()
faceLandmark = FaceLandmark()
emotionDetection = EmotionDetection()
faceRecognition = FaceRecognition("./database/")
Now we can write our code and run the AI models.
We have successfully created an AI pipeline using MuseBox. Here is the output:
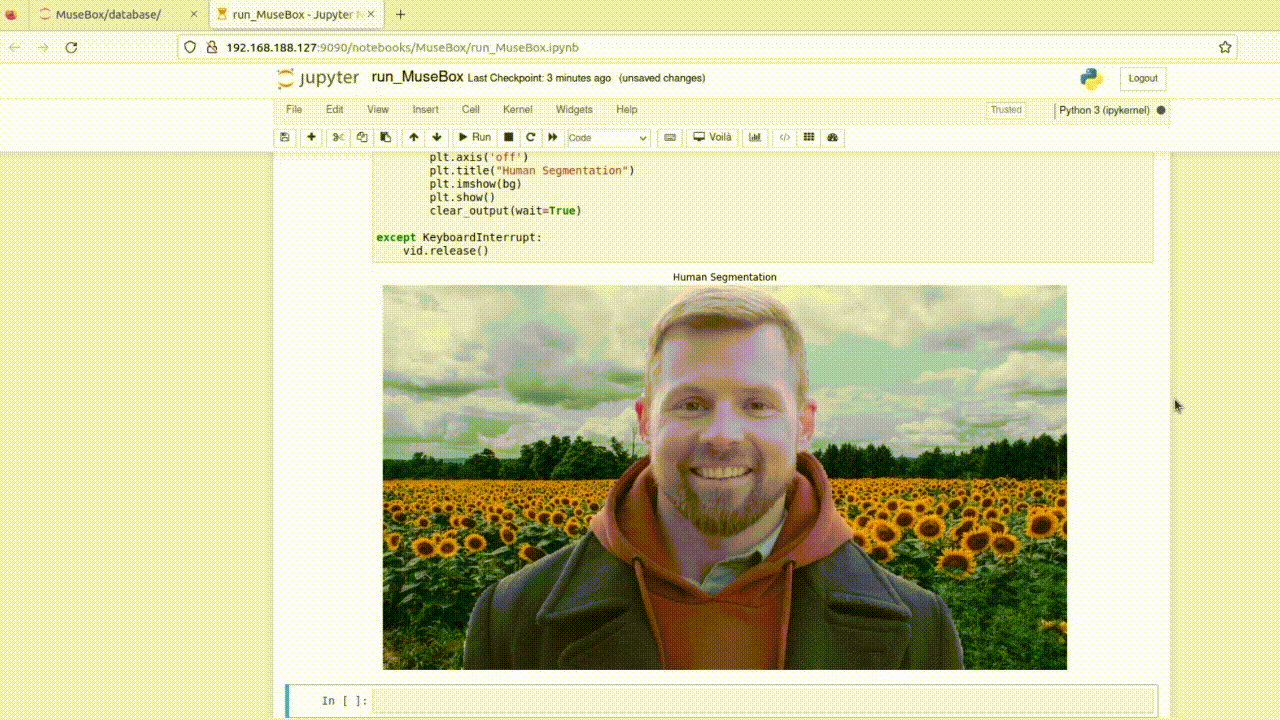
Human Segmentation
Another example that we will see, is using a single AI model, human segmentation. The code for this example is:
Output:
Assets:
- Jupyter Notebook: run_MuseBox.ipynb
- Video: video.mp4
- Human Segmentation Sunflower bg: bg.jpg
- MuseBox Python Bindings: e-mail us!
Conclusion
In this article, I have introduced MuseBox and PYNQ, two powerful tools for creating AI pipelines in FPGA. I have explained how they work together and how they can be used to implement various AI applications. MuseBox and PYNQ offer a flexible and efficient way to develop and deploy AI solutions in FPGA, with some advantages over other AI platforms. I would like to thank the PYNQ team for their support throughout this project.
