NES on KR260: the great retrogame console
Introduction
Are you ready to embark on a nostalgic adventure, where vintage gaming like the NES meets cutting-edge technology?
In this electrifying tutorial, we'll take you on a journey through time, guiding you step by step as you transform your FPGA board into a portal to the past. Say goodbye to tedious button mashing on emulators and embrace the authentic experience of playing NES games on actual hardware.
But wait, there's more! We won't just leave you hanging with a bunch of technical jargon. We'll provide you with a treasure trove of resources, including the coveted source code on GitHub. With a few clicks, you'll have all the tools you need to breathe new life into those iconic NES games and share the joy with fellow retro enthusiasts.
So grab your caffeinated beverage of choice, put on your favorite 8-bit tunes, and get ready to unlock the secrets of the AMD KR260 FPGA. It's time to bring back the golden era of gaming, one pixel at a time! Are you up for the challenge? Let's press Start and dive into the tutorial of a lifetime.
Missed the previous articles on retro gaming? Here they are!
GameBoy on KR260: the retrogaming journey
PacMan on KR260: RTL approach for retrogaming
Catch up on all the retro gaming goodness you might have missed!
The NES history
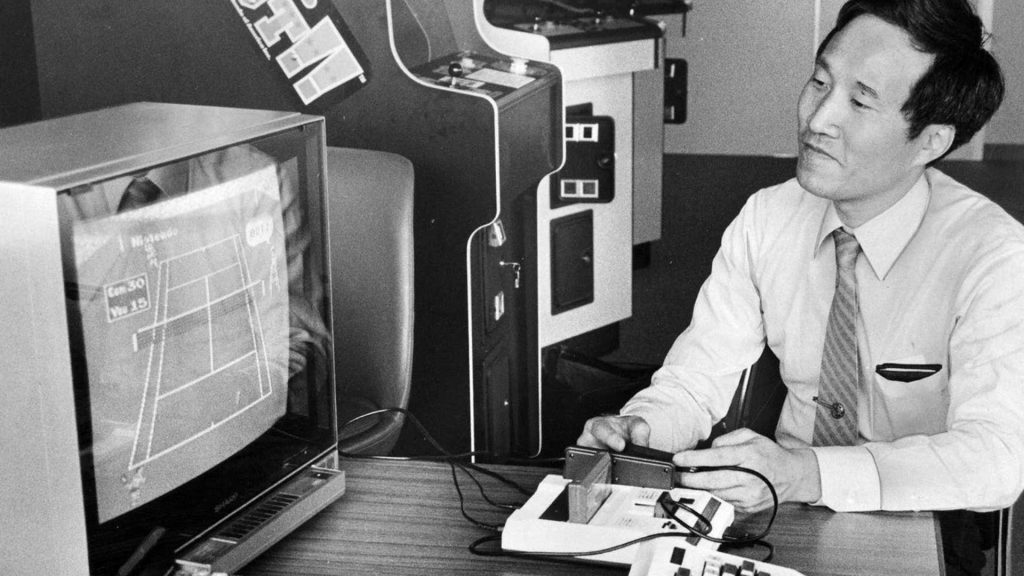
Masayuki Uemura creator of NES and SNES
In the mid-1980s, a gaming revolution was brewing, and it was about to change the entertainment landscape forever. Enter the Nintendo Entertainment System (NES), a console that would become the cornerstone of the gaming industry and ignite a passion for gaming in millions of hearts worldwide.
The story of the NES began in Japan in 1983 when Nintendo released the Family Computer, or Famicom for short. With its sleek design and innovative gameplay, the Famicom quickly captured the imagination of gamers, paving the way for Nintendo's global domination.
Later, in 1985, Nintendo introduced the Famicom to the North American market as the Nintendo Entertainment System. With a redesigned exterior and a robust marketing campaign, the NES arrived on American shores, poised to take the gaming world by storm.
The NES was more than just a console; it was a gateway to immersive and unforgettable gaming experiences. It introduced us to iconic characters like Mario, who embarked on countless adventures in the Super Mario Bros. series. It brought us The Legend of Zelda, a fantasy epic that captured our imaginations and spawned an enduring franchise. And who could forget the excitement of battling against virtual opponents in classic games like Punch-Out!! and Mike Tyson's Punch-Out!!
In particular, one of the NES's most significant contributions was the introduction of the "Nintendo Seal of Quality." This seal reassured consumers that the game they were purchasing had met Nintendo's rigorous standards for gameplay and quality. It was a mark of excellence that distinguished NES games from the growing sea of mediocrity.
The NES hardware
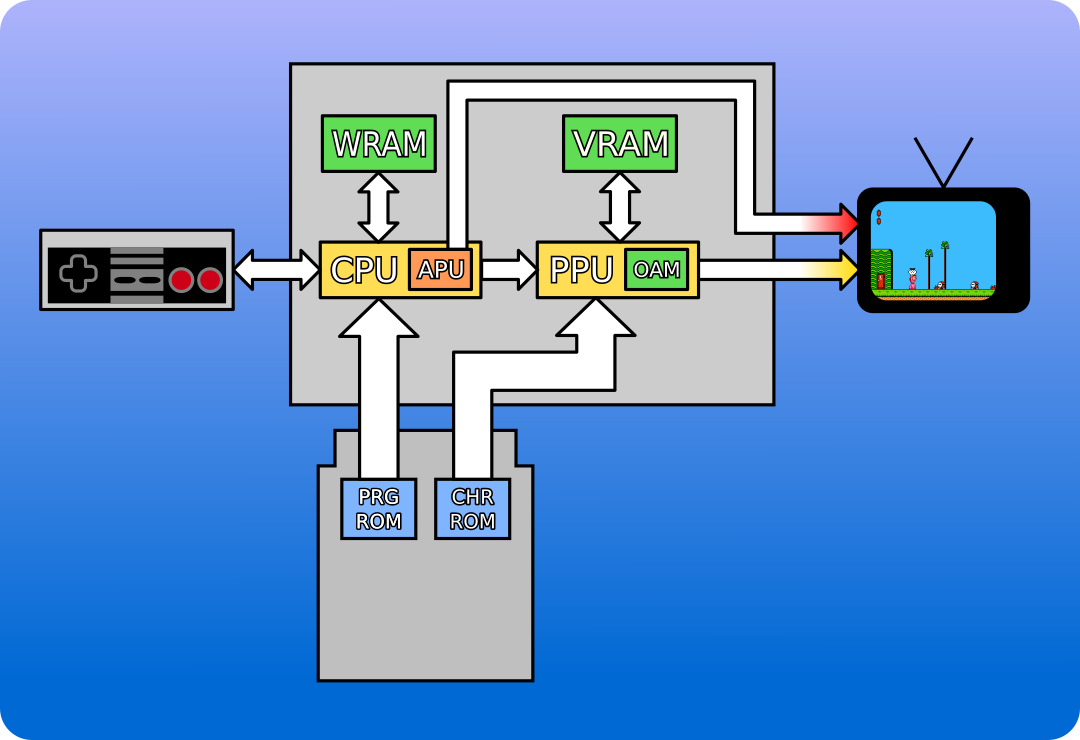
NES Architecture
NES is renowned for its hardware architecture, which played a crucial role in revolutionizing the gaming industry. Let's delve into the key components that powered this iconic console.
The CPU
Firstly, at the heart of the NES lies an 8-bit processor, the Ricoh 2A03 (based on the MOS Technology 6502 chip). Running at a clock speed of 1.79 MHz, this central processing unit (CPU) handles the execution of instructions and manages gameplay logic.
The PPU
Then, working in tandem with the CPU is the Picture Processing Unit (PPU), responsible for rendering graphics on the screen. The PPU incorporates a palette of 64 colors and supports various display modes, enabling developers to create diverse visual experiences.
The Memory
Also, memory is a critical aspect of any computing system, and the NES is no exception. It is equipped with 2KB of onboard Random Access Memory (RAM) that serves different purposes. The first 1KB is dedicated to system RAM, which stores program instructions, data, and variables during gameplay. The remaining 1KB is allocated as Video RAM (VRAM), utilized for storing sprite and background tile data.
The audio system
Then, the NES also features a dedicated audio subsystem called the Nintendo 2A03 APU (Audio Processing Unit). This component generates sound effects and music, utilizing two pulse wave channels, a triangle wave channel, a noise channel, and a delta modulation channel. This combination allows for the creation of a wide range of audio experiences, enhancing gameplay immersion.
The games
Finally, the console's unique cartridge-based system sets it apart from its contemporaries. Game cartridges, known as ROM cartridges, contain read-only memory (ROM) chips that store the game code and data. This architecture allowed for a diverse library of games and offered developers the flexibility to push the hardware's limits.
The NES porting: fpgaNES
In the realm of open-source projects, numerous endeavors have emerged to recreate the nostalgic experience of the classic Nintendo Entertainment System (NES) through the power of Field-Programmable Gate Arrays (FPGAs).
Also, among these initiatives, a notable group of projects collectively known as "fpgaNES" has gained recognition for its exceptional contributions to the field. In particular, one noteworthy project within the fpgaNES ecosystem is the porting effort based on the resources found at https://github.com/strigeus/fpganes. So this repository serves as a valuable starting point for those interested in diving into the world of FPGA-based NES emulation.
Step-by-step design
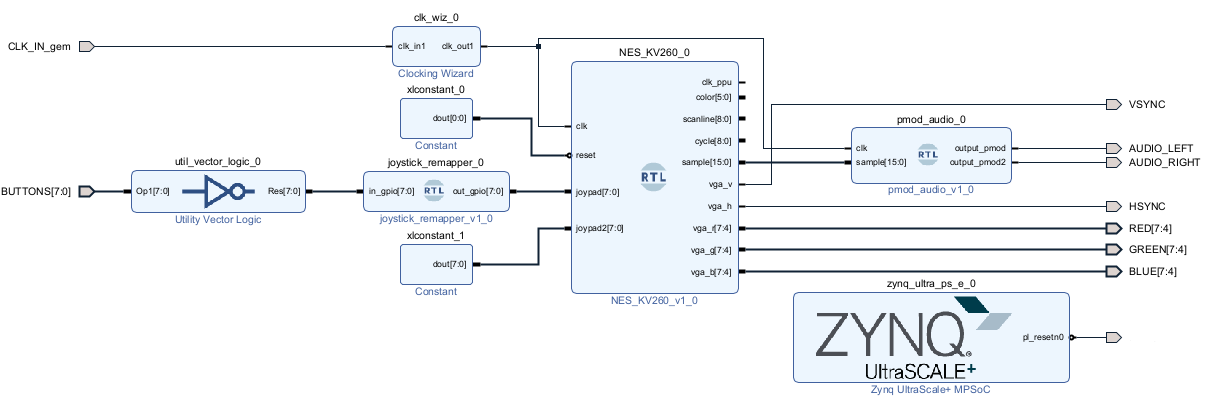
Block Design Vivado NES
Step 1: Obtaining the fpgaNES Project from GitHub
Begin the porting process by acquiring the fpgaNES project from the GitHub repository. This serves as the foundation for the subsequent steps, providing the necessary source files and project structure.
Step 2: Creating a New Vivado Project
As the original fpgaNES project was based on ISE, create a new Vivado project and import the project's sources. By transitioning to Vivado, you leverage its enhanced features and compatibility with the KRIA KR260 FPGA.
Step 3: Adding Compatible Constraints for the Board
To ensure proper functionality on the KRIA KR260 board, include compatible constraints specific to the board's pinout. These constraints define the mapping between signals in the design and physical pins on the FPGA.
Step 4: Verifying Pinout Compatibility
Thoroughly examine the pinout of the KRIA KR260 board and verify its compatibility with the fpgaNES project's pin requirements. Check if any pull-up or pull-down resistors are necessary and configure them accordingly to ensure reliable signal integrity.
Step 5: Porting Incompatible Components: Memory and Clock Manager
Identify any components in the original fpgaNES project that are incompatible with the KRIA KR260 and proceed to port them. This typically involves replacing or modifying the memory and clock manager modules to align with the new platform's specifications and requirements.
Step 6: Adding a Sigma-Delta Audio Output
Enhance the fpgaNES project by integrating a sigma-delta audio output using Verilog. This addition improves the audio quality and fidelity of the NES emulation, enhancing the overall gaming experience.
Step 7: Pin Remapper for Joystick Compatibility
Introduce a pin remapper module to ensure compatibility between the joystick pinout of Nintendo systems and the PMOD connectors on the KRIA KR260 board. This adaptation enables seamless integration with existing projects, such as the GameBoy project, by aligning the joystick signals with the appropriate PMOD pins.
Step 8: Adding an Interface with PYNQ for Bitstream Loading
Include an interface with the Programmable System (PS) component of the Zynq Ultrascale+ FPGA. This interface enables the ability to load the fpgaNES bitstream from PYNQ, a Python-based framework for FPGA development. This integration provides flexibility and ease of use when deploying the NES emulation project.
Step 9: Utilizing a PMOD VGA Adapter for Graphics Handling
To enable visual output and enhance the graphics capabilities of the fpgaNES project, incorporate a PMOD VGA adapter. This adapter facilitates the connection between the FPGA and a VGA display, allowing for crisp and vibrant visuals. Detailed instructions on how to utilize the PMOD VGA adapter can be found in previous articles, such as the Pacman and Gameboy articles. For a comprehensive understanding, readers are encouraged to refer to those resources ?.
Conclusion
Congratulations, fellow retro gamers! You've made it to the end of this exhilarating journey through the tutorial on porting the legendary NES console to the powerful AMD KR260 FPGA. Now, it's time to wrap things up with a big finale!
We hope this tutorial has taken you on a thrilling ride, combining the nostalgia of the NES with the cutting-edge capabilities of FPGA technology. You've learned the ins and outs of transforming your FPGA board into a time machine, whisking you back to the era of pixelated wonders and unforgettable gaming adventures.
Remember, this journey doesn't end here. The AMD KR260 FPGA is just the beginning of your retro gaming endeavors. Stay tuned for future articles where we'll explore more FPGA-powered gaming magic, take on new challenges, and resurrect more gaming legends.
We want to extend a massive thank you to all the retro gaming fans who joined us on this adventure. Your passion and love for the classics keep the spirit of gaming alive. Let's continue to celebrate the joy of pixelated art, tight controls, and the simple pleasure of blowing into cartridges to make them work (we all did it, don't deny it!).
So, grab your NES controller, fire up your FPGA-powered console, and get ready to immerse yourself in the wonders of retro gaming. The AMD KR260 FPGA and the NES classics are waiting for you to make history once again.
Stay tuned for our next adventure, and until then, keep gaming, keep smiling, and keep those retro vibes alive! Game on!
https://github.com/MakarenaLabs/NES-KR260
