PYNQ-DPU on CorazonAI
![]()
PYNQ is a framework which allows us to use python bindings on the FPGA.
However, having the bindings for python, doesn’t necessarily just mean the possibility of working very easily with our custom IP cores.
In fact, python is a gold standard programming language in computer science and one of its main uses is related to AI.
Python offers a set of APIs for BLAS, DSP and numerical applications thanks to its library NumPy and the bindings with OpenCV.
The usage of those libraries is for pre-process and post-process of the data that the AI model is using, from classical graph based AI algorithms to modern complex Deep Neural Network.
In conclusion for this introduction we post a typical working pipeline for AI:

It is important to see that the pipeline does NOT include just the inference. Sometimes we see impressive performances declared by companies, but very few times we see the performances for the WHOLE pipeline.
So, moving forward, is it possible to accelerate the complete pipeline for video analytics application for every stage? The answer is yes, and the answer to which board we should use is CorazonAI. How do we build a complete pipeline for CorazonAI? We now detail every step.
First we need to identify eventual heavy pre-process functions, such as resizes, color changing and high (or low) pass filtering. For those functions we can create an IP core thanks to Vitis HLS. This tool allows the user to synthesize code from C++ to RTL, without any previous knowledge of digital hardware design. Here the link to the UG page:
https://www.xilinx.com/html_docs/xilinx2021_1/vitis_doc/introductionvitishls.html
Remember, when selecting the part, that CorazonAI is a ZU5 device, with -1 of speed grade.
Before moving on and creating the design, we must have in mind what is our final goal. Our final goal is to create a platform which should integrates the IPs to accelerate all the pipeline stages. For AI Inference Xilinx provides to the end engineers an IP called DPU (Deep Learning Processing Unit).
Second we need to integrate in a platform all the IPs. I recall that after this first step we have a set of IPs, which are the accelerated functions from the previous step. We now proceed in the creation of the platform, which integrates all the IPs except for the DPU. To do that we must use Vivado IPI (IP Integrator). The steps are well detailed here: https://github.com/Xilinx/Vitis-Tutorials/blob/2021.1/Vitis_Platform_Creation/Introduction/02-Edge-AI-ZCU104/step1.md
The link shows how to create a Vivado design for a valid platform. Remember that our platform is a ZU5 (base architecture of CorazonAI). At the end we should have a schematic like this:
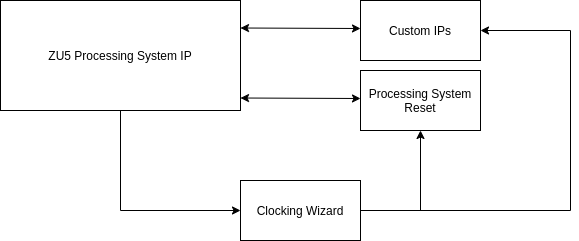
Finally we have a complete hardware stack which can be used as a hardware reference platform.

[…] Do you want to use Python, MuseBox and FPGA altogether? Check out our latest article: PYNQ-DPU on CorazonAI […]