
Reading GPS Coordinates through PYNQ
Reading GPS Coordinates through Pynq-z2
Have you ever wondered how to find your Pynq-z2 if you lost it? We thought about it for a long time. So we thought it was great to be able to read the GPS coordinates through our Pynq-z2.
What you are about to read is a short article in which we will explain how to access these functionalities.
Overview: BN-880 GPS Module
First of all, let's introduce the essentials of this little device.
With its small size, it provides a wide range of GPS formats. You can read them via UART and I2C connections.
These features make this product useful and easily manageable. Which is great for our projects!
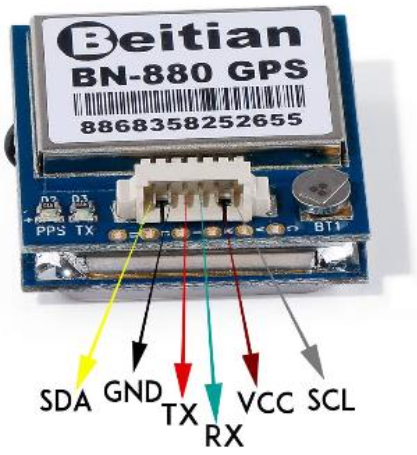
As shown in the image above, the connections are really simple. Let's consider a UART connection: the cables of our interest are the four central ones. The remaining two are the I2C connections
Through these, It is easy to receive all those GPS formats we anticipated before. For example, Galileo, GLONASS, and GPS, but there are also BeiDou, QZSS and SBAS, and others.
First Connection
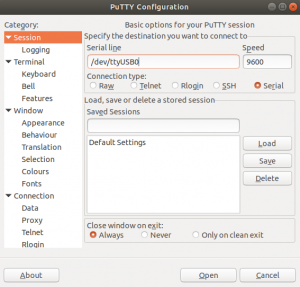
Moving on to a practical test, you just need a USB UART bridge, and simple software, such as "tio" or "PuTTY".
Assuming you are using the latter, do as follows:
- On the first page, "PuTTY Configuration", select "serial";
- Then, set the port name with the one you connected the device.
- Complete by setting the baud rate to 9600.
- Finally, press "Open" to start the serial communication
If you have connected the cables correctly, the following windows will show all the messages that contain the GPS coordinates.
Pynq Set UP
It's a piece of cake.
We will only give a tip of what you need to do. Because we have already explained this in our previous article.
You don't know how to create a UART interface on the Pynq-z2 PMODB? Go check out our previous article!
LINK TO THE ARTICLE : https://www.makarenalabs.com/spi-i2c-uart-on-pynq-a-pl-approach/
First of all, you need to select which pins to use for the TX and RX connection, together with the labels in the schematic.
Go ahead, and create the model via Vivado. Set the correct constraints.
After that, through the UartAXI class present in our GitHub, you can get the basic methods to send and receive messages.
Reading GPS Data
Let's take a step forward. We will make the BN-880 data usable.
Before starting, we point out that we will receive data constantly from the device. In fact, Each message represents an update of the current position.
Furthermore, each message has a precise structure. This is a composition of lines that contain the same information. Indeed, the lines represent different formats.
Having said that, how can we read and collect the data?
Start from UartAXI class
All you need to do is add new methods to this class. Note that we will only focus on the reading function, as the GPS device can only write.
def read(self, count, timeout=10):
   # status = currentStatus(uart) bad idea
   buf = ""
   stop_time = time() + timeout
   for i in range(count):
      # Wait till RX fifo has valid data, stop waiting if timeoutpasses
      while (not (self.uart.read(STAT_REG) & 1 << RX_VALID)) and (time() < stop_time):
         pass
      if time() >= stop_time:
         break
      buf += chr(self.uart.read(RX_FIFO))
   return buf
How does it work? It reads a limited number of characters, determined by the variable "count".
What we want instead is a function that records messages from the buffer regardless of its size.
In order to achieve this, we build our new methods for the UartAXI class.
Read_next_block Function
def read_next_block(self, timeout=10):
   stop_time = time() + timeout buf_FILO = "&&&&&&"
buf = "" count_line = 0 is_found = False
   while True:
      while (not (self.read(STAT_REG) & 1 << RX_VALID)) and (time() < stop_time):
         pass
      if time() >= stop_time:
         break
buf_FILO += chr(self.read(RX_FIFO))
buf_FILO = buf_FILO[1:7]
      if is_found and (buf_FILO[5] == "$" and count_line >= 11):
         break
      if buf_FILO == "$GNRMC" or is_found:
         #if the target sequence is found
         if is_found:
            #the last char will be added
buf += buf_FILO[5]
         else:
buf += buf_FILO
is_found = True
         if buf_FILO[5] == "$":
count_line +=1
   return buf
This method is the new version of "read".
To briefly explain, this method reads all the characters and seeks the substring "$GPRMC". This pattern identifies the start of a new block of information.
From this point onward, it will store in the variable "buf" all the information, until a new block starts.
Now, in the next step, we would like to extract a single format from the block
Read_one_format Method
def read_one_format(self, format="$GNGGA", timeout=10):
block_info = self.read_next_block()
index_format_begin = block_info.find(format)
index_format_end = block_info.find("$", index_format_begin+1)
   # print("index_begin for the line", index_format_begin)
   # print("index_end for the line", index_format_end)
   return block_info[index_format_begin:index_format_end]
This method calls the previous one. So we can leverage this result to extract a single line. It is simple, each format goes from one "$" to another.
We want more, we like the idea of extracting the information from a single GPS format.
Coordinates_from_GNGGA
def position_from_GNGGA(self, buf=""):
   if buf == "":
      print("The you probably forgot to insert the buffer")
      return "error"
index = buf.find(",")
   # 1° ","
index = buf.find(",", index+1)
   # 2° ","
index_latitude_begin = index+1
   print(index)
index = buf.find(",", index+1)
   # 3° ","
index = buf.find(",", index+1)
   # 4° ","
index_latitude_end = index
   print(index)
index_longitude_begin = index_latitude_end + 1
index = buf.find(",", index+1)
   # 5° ","
index = buf.find(",", index+1)
   # 6° ","
index_longitude_end = index
index = buf.find(",", index+1)
   # 7° ","
index = buf.find(",", index+1)
   # 8° ","
index = buf.find(",", index+1)
   # 9° "," index_altitude_begin = index+1
index = buf.find(",", index+1)
   # 10° ","
index = buf.find(",", index+1)
   # 11° "," index_altitude_end = index
index_height_WGS84_begin = index_altitude_end + 1
index = buf.find(",", index+1)
   # 12° ","
index = buf.find(",", index+1)
   # 13° ","
index_height_WGS84_end = index
latitude = buf[index_latitude_begin:index_latitude_end]
longitude= buf[index_longitude_begin:index_longitude_end]
altitude = buf[index_altitude_begin:index_altitude_end]
height_WGS84 = buf[index_height_WGS84_begin:index_height_WGS84_end]
   if len(latitude) < 2:
latitude = "none"
   if len(longitude) < 2:
longitude= "none"
   if len(altitude) < 2:
altitude = "none"
   if len(height_WGS84) < 2:
height_WGS84 = "none"
   return latitude, longitude, altitude, height_WGS84
NOTA: We will consider just this GPS format as a reference because each one requires its own custom function.
This method simply knows that the comma "," is the separator for all the information. As result, it looks for the values in between.
Using the Python String method "find" we can easily identify the position for each comma and extract the values we want.
Conclusion
At this point, we have everything to be able to obtain the GPS data. Furthermore, these methods are easily generalizable to other formats.
You need to know the format and arrangement of the information within it. And accordingly, change the previous method.
We hope that this article will prove to be useful to all of you dears reader.
